Saturday, April 24, 2010

Unveiling of APP’s Magazine Cover And A Giveaway

Good morning, everyone!!  I just wanted to pop on here and show you the cover of the premier issue of

A Primitive Place Magazine


APPcover5JPEGeangleditjpgRESIZED[1]  photo by Margo Gracia/layout by Ashley Lucente

Isn’t it gorgeous?!!!


To order your subscription

~*~ Click Here ~*~


In honor of this occasion,

we are having a special giveaway on the

APP Blog for our wonderful friends!!


clip_image001

The giveaway includes this lovely

Keeping Room stitchery,

Crow’s Crown grungy candles in it’s own pouch

an a homespun birdie.

All were graciously donated by

Country Culture of Brookline, NH


To enter, click ~here~ to get to

A Primitive Place’s Blog for all the details!!


Until Next Time. . . .Kris


Friday, April 2, 2010

Sausage Casserole and A Sock Dryer Pattern

Happy Friday, friends!!
My daughter, Kory, who has Down Syndrome, is in an Independent Living Skills program at school.  The kids learn how to plan a lunch menu for the week.  They each get a turn picking what they want for lunch one day and then make a list of the items they need.  They then go shopping  for the ingredients and learn money skills in the process.  Each of them is assigned a task to complete each day in preparing the food and setting the table.  After lunch, they wash, dry and put away the dishes and wipe the tables and chairs.
To show their families the skills that they’ve been learning, they invited us for a Spring “Break”fast.  It was held last Friday to celebrate spring and the start of their Spring Break.  They had prepared all week for the festivities by planning the meal, shopping for the food and other items they needed, making and sending invitations, wrapping the silverware and tying them with ribbons, making paper flowers for a centerpiece, typing up the menu,  preparing the food and setting the table.
They were the perfect hosts and hostesses!  They took turns greeting the guests and taking their coats, introducing everyone and offering them something to drink.  We were each handed a menu that they made cut out with crinkled scissors and embossed with stamps and stickers.  We enjoyed homemade blueberry muffins, homemade cinnamon streusel coffeecake, fruit kabobs and sausage casserole.  It was such a great time!!
I’d like to share the recipe for the Sausage Casserole.  It was very delicious and looks easy to make.

Sausage Casserole

8 slices white bread, crust off & cubed
1 lb. sausage
3/4 lb. cheddar cheese, grated
4 eggs, beaten
2 1/4 c. milk
1 can cream of mushroom soup
Brown sausage and drain well.  Place bread in bottom of a 9x13 baking pan sprayed with a nonstick cooking spray.  Place sausage and cheese over bread cubes.  Mix eggs and milk together and pour over bread cub mixture.  Spread soup over top.  Refrigerate overnight.  Take out of refrigerator 1 hour before baking.  Bake at 350° for 40 minutes or until browned.

~*~*~*~*~*~*~*~*~*~*~*~*~

If you’d like to participate or see who else is participating in Colleen’s (Andbabymakesfive) Kitchen Weekly Recipe Swap click here:
Colleen'sKitchen

~*~*~*~*~*~*~*~*~*~*~*~*~

I’ve been working on a few things to decorate my Family Room/Laundry area and thought I'd share a pattern for a sock dryer with you.
IMG_2525
I cut the sock dryer out of 1/4” birch plywood and used 2 different sizes of drill bits – 2 1/8” and 1 3/4”.
I googled images of antique sock dryers and was fortunate to find an antique dealer selling one for $48.  He gave the dimensions and the thickness of the dryer (his was 3/16”), so I used them as a reference in drawing my pattern.  You should be able to right-click and save each pattern piece and then print them out.  Tape them together at the lines and then trace the pattern onto your piece of plywood.
Sock Dryer Sock Dryer 001

Sock Dryer 002

~*~*~*~*~*~*~*~*~*~*~*~*~

Have a very Happy Easter!!
Until Next Time . . . . Kris

Wednesday, March 31, 2010

A Few Pictures

Happy Wednesday, friends!!

I’m sorry I haven’t been posting much lately, but we have been working nonstop trying to get things done before Chuck has to go back to work, which is next week, so the crunch time is on!!

I have never done so much painting, staining and varnishing in my life!! lol I’ve painted the Kitchen, Family Room, stairway, a section of the Rec Room, stairway ceiling, two entry doors, Kitchen cupboards, plus other little odds and ends! I’ve stained and varnished over 40 pieces of trim, the inside pieces to all of the cupboards, plus 4 sets of louvered bi-fold doors!! And to top it off, all of the pieces that got stained, other than the cupboard pieces, had 3 colors applied to them – a few years ago, when we installed new windows, I had to use the 3 colors to match the color tone of the wood floors and the other existing trim. What I thought would take one day, took 3!!!

Well . . . . we’re finally about done with our Family Room!! All we have left to do is the base board trim, which we’ll do after the Kitchen is finished, and LOTS of decorating!! I have many projects planned to make plus a lot of other things that need makeovers, so I’ll have plenty of pictures to post in the future.

We are so thrilled with how this turned out!! It has made such a big difference!! To see some pictures of our Family Room before the renovations, click HERE.

This is a little peak at what my utility room looked like before we removed and built new walls, drywalled, painted, wallpapered, and installed a drop-ceiling:

IMG_2459

Can you say “ugly painted concrete blocks”? I have lived with these ugly walls since the day we moved in 22 years ago!! I even had to deal with painted concrete floors!! Ewwww!! It was the perfect “mud” room for dealing with 2 dogs after they came in from inclement weather and a husband that comes home from work looking like he either got caught in a dust storm or was playing in the mud! lol I was too embarrassed to ever show pictures of my utility room, especially after seeing so many wonderfully decorated ones posted in blogland! And that is why I’m only showing you a small glimpse of the “before”! lol

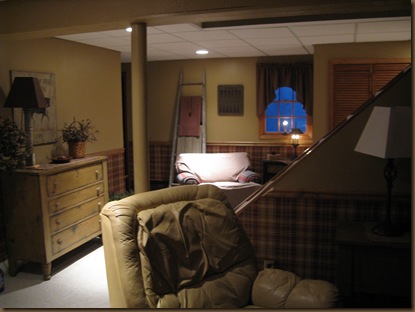
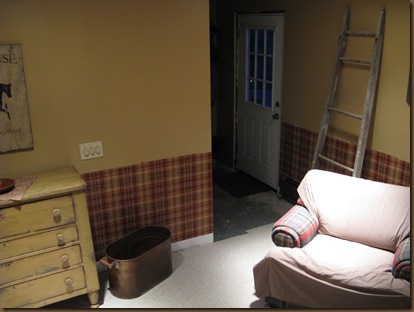
This is the view from the Family Room looking into the new section.

IMG_2492

IMG_2493

( I forgot to “fluff” the recliner before I took this pic! )

Eventually, I’ll replace this chair below with a Wing chair, but for right now, I’m going to buy a slipcover to put over it. We have a 13 year old Dalmatian that, for some reason, has started drooling in the last year or two and it’s nice to be able to just take them off and wash them. Plus the plaids “kind of” clash! lol

IMG_2490

Below shows our “creativity” with the stairs. We didn’t have enough carpet left from what my mom and dad gave us to completely cover the steps and Chuck had already ripped out the old stuff. The fronts of the steps were pretty beat-up, so Chuck cut strips of 1/4” birch plywood and I stained and varnished them and then attached them with PL400.

IMG_2494

This is our new laundry area. I have a couple of projects that I’m working on to hang on the pegboard and I need to repaint the bench. There’s a little door that’ll be installed in the opening in the stairwell – it’s all ready to be installed whenever Chuck gets to it.

IMG_2496

I have a shelf that I want to make for above the benches and the tree will probably get moved elsewhere. I’m not happy with the display on top of the dresser – I don’t know what I want there yet. The lamp ( I need to paint the base piece!) and the picture are staying ( I think. lol)

IMG_2498

This area below is where we’ll come in and take off our coats and shoes. Also where Sam (our dog) will stay at night and when we go away.

IMG_2516

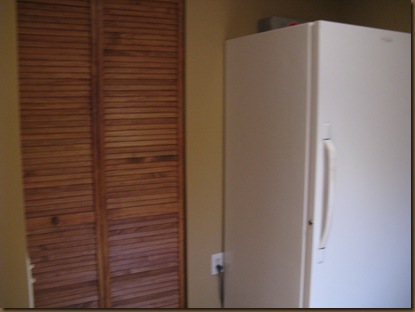
On the opposite side of the door is our freezer and bi-fold doors that lead into our furnace, hot water tank and storage area.

IMG_2504

And now for a couple of pictures of my kitchen!!! I’m having one heckuva time trying to get decent pictures!! They either come out too dark or there’s too much lighting and everything’s a bright haze and I haven’t had the time to play around with the lighting to get good ones. These are the best I have right now – just a few to give you a glimpse of what we have done so far.

This is my new tin-punched light that’s hanging over my sink. I’m searching for either new curtains or fabric to make new ones – I’m having a tough time finding something that I like. IMG_2512

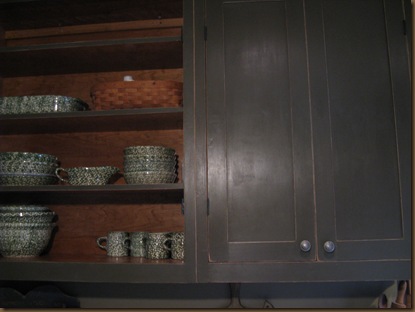
This is a shot of the cupboards to the left of the sink area. Chuck made a boo-boo in the doors for the cupboard on the left, so he had to make new ones. They’re done, they just haven’t put put on yet. I like the look of having my spongeware exposed and wished I would have had a larger cupboard in the center for my spongeware and have 2 smaller cupboards on either side with doors. Oh well . . . . hindsight’s 50/50!

The color is called “Cottage Hill” by Ralph Lauren. It’s kind of a unique color – depending on the lighting it has an olive green tone, a brown tone and even a charcoal gray tone. Unfortunately, Home Depot has discontinued carrying that brand and I bought one of the final gallons of paint that they had left on the shelf. I was kind of panicking because I’ve already used 1/2 of the can just painting the upper cupboards and still have the bottom ones to paint yet. On the last of our many, many trips to Home Depot, I spotted a couple cans of the Ralph Lauren paint sitting on the shelf. As luck would have it, one of the cans was the base tint I needed for the color I’m using, so I bought another gallon to be safe!

IMG_2513

This is our new over-the-range microwave that we’ve installed. Oh my gosh, it is so much quieter than our other one!! You almost don’t even hear it running!! Eventually all of our appliances will be replaced with stainless steel. (When we hit the lottery!! – Boy, those things are expensive!!)

IMG_2515

Chuck has been working diligently on the base cabinets this week. Like I mentioned before, he starts back to work regularly next week, so the crunch time is on to get them done. They won’t get installed right away, though, because the existing concrete countertops need to be broken out and removed and then new ones will be formed and poured, and Chuck won’t be able to do all of that until we have a free weekend and if the weather cooperates. I’ll post pictures of the process when that happens.

It’s amazing how your body changes as you get older!! In our younger days, we could stay up as late as we wanted and just keep working away on projects to get them done.

Now. . . . this is how we feel at the end of the day!! lol Pooped out!!! With all of the renovations we’ve been doing, plus our regular daily chores of cleaning, laundry, cooking, shopping, etc. - we are worn out!!! lol

IMG_2518

Ahhhh. . . .To live the life of a cat! This is Lucy. Isn’t she a cutie?

Well, friends, I must get back to work!! I will be back on Friday with a wonderful recipe that my daughter, Kory, and her class made for all of the parents for a Spring “Break”fast, plus a simple, easy-to-do project.

Until Next Time. . . .Kris

Friday, March 26, 2010

Did you hear the BIG NEWS?????

ANNOUNCING

A PRIMITIVE PLACE MAGAZINE

Coming August 2010!!

.applogo-2[1]

A Primitive Place website has been growing by leaps and bounds since October 2008 and now we have the biggest news yet! Starting this fall, APP will have it’s very own prim magazine with never seen before home tours, decorating ideas, garden tours, recipes, crafts, and so much more! To find out all about it including what’s inside the first issue, how to subscribe and how to advertise, click HERE!

Isn’t this exciting? Make sure you click on the link and sign up for a subscription so that you don’t miss out on the first issue!!

I’ll be back Sunday evening with more pictures of my Family Room and Kitchen!

Until Next Time . . . .Kris

Thursday, March 18, 2010

WHEW!!! I’ve Been a Very Busy Girl!!

Well . . . . where do I start?!  In my last post I mentioned that we’d begun making our kitchen cupboards.  Well, that project snowballed into a much larger renovation!!  Things have been moving so fast and we have been working so hard to get things done before Chuck has to go back to work that I haven’t had time to make any posts, much less, even be on the computer!!

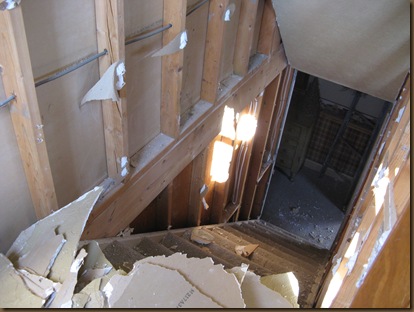
It all started after we removed a brick wall in the kitchen.  After tearing down all of the brick and drywall, my hubby decided to remove all of the drywall in the stairway leading downstairs.  There was an ugly swirl patterned stucco on it and we had talked about one day redrywalling the whole thing.  His thinking on the matter was, since we already have a mess, what’s a little more?  So, all of that drywall came down, too.

IMG_2424

IMG_2428

About a month before we started all of this, as we were sitting downstairs in our dark, dreary family room, we talked about one day possibly removing the walls from the lower half of the stairs and opening up the family room and the utility room.  Between the light from the door at the top of the stairs and the window in the utility room, we thought it would brighten up the family room a lot.

So. . . . . since we already had a big mess. . . . .guess what we did?  lol

IMG_2433(I guess I didn’t take a picture of the “before”.  This is after the stairway has been drywalled)

Besides removing the lower part of the walls, we also removed the wall at the bottom of the stairs on the right that leads into the utility room.

With the removal of the walls, some of the electrical wires and light switches had to be moved.  So. . . .since Chuck had to do that, he decided to run wiring over into the family room to places we had planned on putting recess lighting (some day in the future – along with a new drop-ceiling).  All of that wiring would be going to the light switch panel that he was installing, so that portion of the project would be done - all he would have to do was connect the wiring to the recessed lighting when we decided to install them.

After he removed a few of the old ceiling tiles to run the wiring, he got annoyed with all of the cable wires and phone lines that were dangling down in his way.  So. . . . he decided to take down all of the old tile and untangle and then coil up and tack all of the wires in place.

IMG_2440

“You know, instead of putting all of that old ceiling tile back up, why don’t we just go ahead and tear down all of the old framework and put  up a new ceiling with the recessed lighting?!” . . . . Okay, honey!! . . . .

So many things were going on at one time and we have been so busy that I forgot to take pictures of the progress as it was happening.

Here is what we have done so far . . .IMG_2475

We framed out and drywalled an area for our washer,  dryer and laundry tub.  We removed the old cabinets above our washer and dryer and built shelves.  I painted the entire interior white.  We had a big double-door armoire standing where the red bench sits that held all of my power tools, sand paper, nails, bug sprays, cleaning supplies, etc.  It was a total disaster area!!  I went through everything and got it all organized and then put it on the new shelves.


IMG_2485

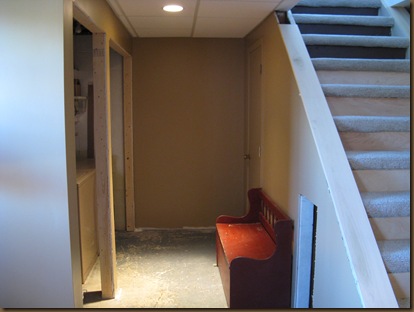
This view is from standing on the stairs. As I mentioned before, we removed the wall/doorway at the bottom of the stairs the led into the utility room.  We extended the back wall – starting from about where the dresser ends – which still gives us a little area to come in and take off our shoes and hang up our coats.

I was lucky to have almost a whole roll of wallpaper left from when we had refinished our family room a few years ago!  I had just enough to finish the extended wall, plus the wall  in the new section that can be seen from the family room.  I wasn’t fortunate enough to have any of the border left, so I had to remove all of the existing border and then I repainted all of the walls.  The color that I used before is no longer made, so I chose “Mesa Tan” from Sherwin Williams.


IMG_2484

My Mom and Dad are installing hardwood floors in their Great room and since their carpet was still like new, Chuck brought it home with him after he helped my Dad and brother remove it.  We had enough to do all of the family room plus the little area in the new section.  We ran a little short to cover all of the stairs, so we had to get creative.  We had enough to cover the stair treads, but not the fronts, so we cut 1/4” thick boards and will nail those to the fronts  (pictured above).  It’ll work for now and then in a year or two, we’ll have new carpet installed.  The cap pieces to the stairs and the front pieces aren’t nailed on yet – they need to be stained first. IMG_2479

This is the little area as you come in the back door.  We replaced our solid steel door with this 9-lite door.  What a big difference!!

Today, since the weather is suppose to be nice, I’m staining the bi-fold doors for the laundry area, the chair rail moulding, the window and door frame moulding, and all of the pieces for the stairs.  Then tomorrow, while Chuck is nailing all of the trim pieces on, I’m going to paint the back door and then install vinyl tile in the coat area and the laundry area. 

The only thing we’ll have left to do downstairs is the base board trim, but that’s going to wait until after my kitchen gets finished, which somehow got put on the back burner!!

Speaking of my kitchen. . . . . we have the wall cabinets installed, along with a new stainless steel over-the-range microwave, under-cabinet lights and my new punched tinware light that hangs over my sink.   We still have to put  the trim moulding on top, but that should be done by this weekend. The pictures I took and were going to post didn’t turn out. . . some were blurry and the others were so dark, you couldn’t even see my cupboards!!  I didn’t have time to take new ones and I wanted to get this post in since it’s been so long since my last one. 

I sure can’t wait until  everything’s done!!!  We have been living in total chaos for the last few weeks.   Most of my kitchen stuff was sitting in my dining room and even though I tried to leave out things that we used every day, I still found myself digging through boxes looking for things.  We had very simple meals like sloppy joes and french fries and spaghetti and meatballs. . . .things that were quick and easy!!  lol

My downstairs was all torn up and my rec room was a disaster area!!  All of the materials we used got stored in there!  And the drywall dust!!!!. . . .  As much as we tried to cover things up, it still seemed to find every nook and cranny in my house!  lol  I have been doing a lot of cleaning!! . . . . I think I have finally conquered it!   (I hope!!)

On Monday, Chuck and I are taking a well deserved day off and heading to Amish country.  We’re starting with breakfast at Rebecca’s Bistro and then stopping at my favorite antique mall along with a few of my favorite prim shops.  I have a loooong list of things I’m in search of to decorate my family room and kitchen!

I’ll be back sometime next week with more pictures of my family room completed and with some new decor!!  Also, better pictures of my kitchen!!


Until Next Time . . . . Kris


Friday, February 19, 2010

Spring Goodies and Raspberry Cookie Bars

Happy Friday, friends!   I don’t know about some of you, but I’m tired of all of this snow that we’ve been getting!!  A couple of weeks ago, our local weatherman pointed out that, as of that day, we had only 34” inches of snow fall compared to last year’s total of 70”.  Well . . . I think we more than made up for the deficit!  I don’t know what the exact total is, but I’m sure we went well over the mark with all of this snow we’ve been getting.  The only good thing about this kind of weather is that my hubby is home a lot.  He has his own concrete business and so this is a slow time in the year for him, which is also the time of year when most of our inside projects get done.

For a long time, we’ve wanted to replace our kitchen cupboards.  I have a very small galley kitchen with minimal storage space so we figured we could gain more space by replacing the standard 30” high wall cupboards with 42” to-the-ceiling cupboards.  We went to Home Depot and Lowes and got prices ranging between $5,000-$6,000!!   What?!!!  Cupboards are that much for my tiny little kitchen?!!!   We were kind of figuring $2,000-$3,000 and I wasn’t even really happy with any of the styles that they had.  I wanted inset doors without any overlay, but all of the styles had an overlay.  We then went to a local independent cabinet company.  Chuck figured that they would have better prices since there wasn’t any “middle man” to go through.  By then I had already decided that I wanted to paint the cupboards a charcoal grayish color – picking out one of the colors from my slate floor tile (which isn’t as brightly colored as shown in the pic- it’s much more subdued).  They had a couple of styles like what I was looking for, so we got prices for unfinished and finished cupboards.  Okay are you ready for this?!!  Unfinished were a little over $7,000 and finished were over $8,000!!  Whoa!!!  A little too much for me!  So we decided to make them ourselves.  And let me tell you, it’s been a very long, time consuming process!!

IMG_2416

IMG_2417

After Chuck cut and sanded all of the pieces for the base of the wall cabinets, I had the fun of staining each of the inside pieces and then applied 2 coats of polyurethane with sanding in between coats before he assembled them.  I figured it would be a lot easier doing them that way than trying to get in the corners after they were put together.  My Rec room was wall-to-wall with cupboard pieces!

I chose a color by Ralph Lauren called “Cottage Hill” (which Home Depot has since discontinued).  It’s kind of hard to describe. . .depending on the lighting sometimes it looks gray, sometimes an olive green, and sometimes a brownish color.  I haven’t had a chance to take a picture of it yet, but I’ll try to post one later. I don’t know if you’ll be able to get the true color or not.

I had made many sample boards before I finally came up with a finish that I liked.  I’ve decided to just lightly sand around the edges.  I don’t want them “too prim”, just simple. . . no stain, no heavy sanding, just simple.  So far, I’ve given everything two coats of paint and today I’m going to apply a sealer which will reduce the amount of scratching to the paint when I lightly sand the edges.  The final step will be to apply plain paste wax and then they should be ready to install.

Unfortunately, that won’t happen until after we remove all of the brick on the one side of the kitchen and replace the drywall, which Chuck is starting on that today.  I love the look of the brick, but the color doesn’t match my color scheme.  Eventually, we’ll install new brick.  But, for now, it’s just going to be primed and painted.  The kitchen will get painted the same color as the Living room and Dining room that I had painted right before Thanksgiving.
IMG_2413 

It’ll be a long, slow process to finish the kitchen.  Our countertops are concrete, which are also going to be replaced.  They’ll still be concrete, which I absolutely love, but our base cabinets are about 3” longer than the wall cabinets near the refrigerator.  We’ll eventually replace all of the appliances with stainless steel and want to get a side-by-side refrigerator.  The one we have now is only 23 cubic feet due to the base cabinets being too long.  We need to have the sides finished in stainless steel since that is what you see most of when you look into the kitchen.  Our options for a fridge in that size with those requirements are much slimmer than those for a 25 cubic foot one, so we’re reconfiguring the cabinets from the dishwasher down to the refrigerator to accommodate for a larger fridge.

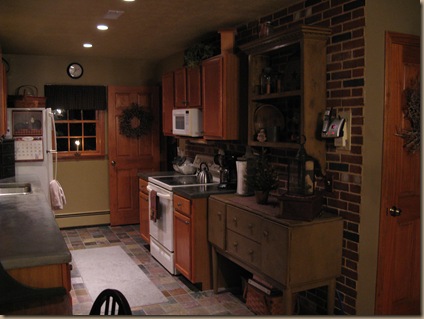
As you can tell from the pictures, the lighting is horrible, so we’re installing under-the-cabinet lighting.  Yayyy!!  We’re also replacing the recessed light over the sink with this new tin-punched one that was just delivered Wednesday.  It’s kind of funny…I  found this light online from a place called “Rustic Log Lighting”.  It was only $87.00 with shipping included.  The company is based in Montana and when I called to place the order, the gentleman said that the light would be shipped from a company in Pennsylvania.  When it came, the return address was “Irvin’s Country Tinware”.   I was so excited!  I love Irvin’s, but some of their things are a little pricey.   I’m thinking, “Great!  I could have just ordered from them in the first place and saved a couple of bucks”.  But, I looked up the light in their catalog and they were asking $79.99 and an additional $13.99 for shipping and handling.  That totals $93.98.  I only paid $87.00, so I saved $6.98!!  Can’t beat that!!

IMG_2409

This kitchen remodel is snowballing into another project.  The cabinets that we are taking out are going to be installed down stairs in the kitchenette area of our Rec room.   After Chuck is done removing the brick and replacing the drywall in the kitchen today, he’s going to tear out the downstairs cupboards and the drywall there, which also needs to be replaced.  He figures if he’s mudding walls, he may as well do them both at the same time.  Needless to say, I’m going to have a huge mess in my home for the next couple of days!!

♥ ♥ ♥ ♥ ♥ ♥ ♥ ♥ ♥ ♥ ♥ ♥ ♥ ♥ ♥ ♥ ♥ ♥ ♥ ♥ ♥ ♥ ♥ ♥ ♥ ♥ ♥

In between waiting for stain and varnish to dry, I was able to get a couple of spring craft projects done this past week.  I actually had sewn these bunnies last year, but never did anything more with them.  I just stuffed and tea-dyed them and stitched their eyes and noses.

IMG_2423  

I made this guy  by adapting a pattern that I had bought from Pattermart for a snowman that I absolutely love!  I just made a new head pattern and added ears.  Click here if you’d like to purchase the snowman pattern.  I also made the carrot and stuffed it with Sweet Annie.

IMG_2408

I’m also working on a horse from a pattern by T.F.C.  Folkart.   All I have left to do is apply the flax for his mane and tail, which just came in the mail yesterday, but I haven’t had a chance to finish it yet.

♥ ♥ ♥ ♥ ♥ ♥ ♥ ♥ ♥ ♥ ♥ ♥ ♥ ♥ ♥ ♥ ♥ ♥ ♥ ♥ ♥ ♥ ♥ ♥ ♥ ♥

A couple of weeks ago, Chuck and I stopped in at Goodwill. . . I don’t know why - I never find anything great like a lot of you do. . .but every once in a while, I figure “what the heck” and stop in.  Chuck found this dresser and wants me to “work my magic” on it.  lol  He wants to replace the one in our room that he uses for his clothes with this larger one.  (I claimed all of the stepback cupboard for myself!)  I haven’t started on it yet. . .it’s still sitting in my Rec room waiting to be made over.  Someday . . . .

IMG_2385  

♥ ♥ ♥ ♥ ♥ ♥ ♥ ♥ ♥ ♥ ♥ ♥ ♥ ♥ ♥ ♥ ♥ ♥ ♥ ♥ ♥ ♥ ♥ ♥ ♥ ♥ ♥

In participating in Colleen’s (And Baby Makes Five) Kitchen Weekly Recipe swap, I wanted to share this awesome recipe for Raspberry Cookie Bars.  I found this recipe on the back of the box of the graham cracker crumbs when I made the disappointing Peanut Butter Cup Cheesecake.   At least one good thing came from that fiasco!  lol   I made these for my family for Valentines and were a huge hit!  They are so easy to make!!

IMG_2388

Magic Raspberry Cookie Bars

2 c. graham cracker crumbs

1/4 c. sugar

1/2 c. margarine or butter, melted

1 can (14 oz.) sweetened condensed milk

1 1/4 c. seedless red raspberry preserves

1 1/3 c. flaked coconut

1 c. chopped walnuts or pecans

In a small bowl, combine crumbs and sugar.  Add margarine or butter.  Toss until combined.  Press into bottom of 13x9 inch baking pan.

Evenly drizzle sweetened condense milk over crumbs.  Refrigerate for 10 minutes.  Spoon preserves over top.

Sprinkle with coconut and nuts.  Bake a 350°F for 25 to 30 minutes or until light brown.

Cool completely.  Cut into bars.  Store, loosely covered, at room temperature.

♥ ♥ ♥ ♥ ♥ ♥ ♥ ♥ ♥ ♥ ♥ ♥ ♥ ♥ ♥ ♥ ♥ ♥ ♥ ♥ ♥ ♥ ♥ ♥ ♥ ♥ ♥

If you would like to participate or see who else is participating in Colleen’s Kitchen Weekly Recipe Swap click on the picture below to take you to her blog.

Colleen'sKitchen

♥ ♥ ♥ ♥ ♥ ♥ ♥ ♥ ♥ ♥ ♥ ♥ ♥ ♥ ♥ ♥ ♥ ♥ ♥ ♥ ♥ ♥ ♥ ♥ ♥ ♥ ♥


I meant to share this picture with you in my last post but somehow it got left out.  I took this a day before we got hammered with mountains of snow!   Spring  IS around the corner!!  These are some of my daffodils popping up!  Yayyy!!!

IMG_2362 

Until Next Time . . . .Kris 


Friday, February 5, 2010

Peanut Butter Cookies And More

Tuesday was my daughter, Brittney’s, 24th birthday and we took her out for dinner to the restaurant of her choice. She chose to go to a place called Steak On A Stone. We had never been there before but a couple of people have told us how wonderful it was. Their specialty is having you cook your own meat on a stone that’s heated to 750°. You can choose steak, chicken, shrimp, scallops, duck, lamb chops, pork tenderloin and lobster tail and when the waiter brings it out to you, it’s already browned on one side and he does a demonstration on how you cook your food. He flips the meat over to brown the other side and then tells you to slice off and cook each individual piece to your preference of wellness. It was pretty neat!! Chuck and Justin got steak, Brittney got Shrimp and Kory and I opted to have a meal already cooked – she got a cheeseburger and I got Lake Perch. Sorry, but one of the reasons why I like dining out is because I don’t have to cook! lol I didn’t want to have to work at making my meal!!

♥ ♥ ♥ ♥ ♥ ♥ ♥ ♥ ♥ ♥

Instead of cake, Brittney found a recipe in the “Taste of Home/Healthy Living” magazine for Peanut Butter Cup Cheesecake. It looked delicious and the recipe was revamped to reduce calories and grams of fat by using fat-free and reduced-fat cream cheese. Now you’re talking!!! A decadent dessert without the guilt!! It smelled like heaven while it was baking and looked even more scrumptious after it was completely done!

Now let me ask you this.. . . doesn’t this look sinful?

peanut butter cup cheesecake

We eagerly awaited until it was time to sing “Happy Birthday” and cut into that yummy confection! With the anticipation of tasting the gooey peanut butter and the rich chocolaty goodness, we took a bite and we all pretty much had the same look on our faces – disappointment!! It had NO flavor!!! I couldn’t believe it! What a bummer!!

If you’d like to try it anyways, just click on the picture to take you to the web page with the recipe.

♥ ♥ ♥ ♥ ♥ ♥ ♥ ♥ ♥ ♥

I’m hoping to continue to participate in Colleen’s Kitchen Weekly Recipe Swap, although I can’t promise that I will be consistently posting each week, but I’ll post when I can. I think it is a fun way to share recipes and I’ve gotten quite a few good ones already! Thank you, Colleen!!

So this week, I would like to share with you a fabulous cookie recipe. Growing up, there was a woman in our small town that was a phenomenal baker and she posted several of her favorite recipes in our church cookbook. This is a basic peanut butter cookie recipe which is outstanding by itself, but I like to add chocolate and peanut butter chips. ( A girl can’t get enough chocolate!!) They have become a favorite in our household and especially with my kids’ friends! Whenever they have a get-together, my cookies are a definite request!

Peanut Butter Cookies w/Chocolate and

Peanut Butter Chips

1c. brown sugar

1 c. sugar

1 c. margarine

1 c. peanut butter

2 eggs

1 tsp. vanilla

3 c. flour

1 tsp. salt

2 tsp. baking soda

1 12 oz. bag chocolate chip

5 oz. (half of bag) Reese’s peanut butter chips

Preheat oven to 350°.

Cream margarine and peanut butter together. Blend in sugar and brown sugar. Add eggs and vanilla. Stir in flour, salt and baking soda. Add chocolate and peanut butter chips.

Drop by spoonfuls onto cookie sheet and bake 8-10 minutes or until nicely browned.

♥ ♥ ♥ ♥ ♥ ♥ ♥ ♥ ♥ ♥

If you would like to participate or see who else is participating in Colleen’s (And Baby Makes Five) Kitchen Weekly Recipe Swap, click on the photo below and it will take you to her blog.

Colleen'sKitchen

♥ ♥ ♥ ♥ ♥ ♥ ♥ ♥ ♥ ♥

Thank you for all the concern and “get well” wishes for my hubby. He went this past Monday and had his catheter removed. And let me tell you, what a world of difference that has made in his attitude!! I don’t want you to think he was crabby or anything, because he wasn’t! If anything, I was the one that was probably crabby! lol He got a clean bill of health and has no more weight restrictions but shouldn’t try to lift anything extremely heavy for a couple more weeks. He can go back to his usual activities and has been knocking himself out doing things around the house! The man has become a little busy body! lol

I think I mentioned before in an earlier post that we wanted to make new kitchen cupboards, but with the holidays and then his surgery, we just didn’t have time to make them. Well. . . . .since he’s feeling so energetic (lol), I just “kind of” mentioned something about them and he jumped right on the bandwagon with me and we’ve begun making them!! Yayy!! It’s going to get done in stages. We’re starting with the wall cabinets, for now, which will make the biggest difference. I have a “galley” kitchen and so my cupboard space is limited. Instead of the standard 30” high cupboards, like we already have now, we’re going to make them to go all the way up to the ceiling, which will give me a lot more cupboard space!! We have concrete countertops (surprise, surprise, since that’s what Chuck’s business is) which I absolutely love!! We’ll have to make new ones due to the fact that there’ll be a slight adjustment in the width of the base cabinets (I’ll explain that later) but it’s a little too cold out to mixing up concrete outside., so those will have to wait until warmer weather. I’ll post pics of the progress.

♥ ♥ ♥ ♥ ♥ ♥ ♥ ♥ ♥ ♥

Well, this post has become a little lengthy!! (Sorry, I have much to make up for!) And I need to bake some more cookies. Justin is having friends over, again, Saturday night after their Sweethearts Dance at the high school. We’re suppose to get a major snow storm tonight into tomorrow morning with a lot of snow accumulation. So I don’t now how big of a turn out he’ll have. The southern part of the state is expecting 6-8 inches while the farther north you go, the snow accumulation will be less. The amount of snow we’re suppose to get keeps changing - it’ll be anywhere from 2-6 inches. So I guess we’ll just have wait and see what we get by morning!

Until Next Time. . . . Kris

LinkWithin

Blog Widget by LinkWithin