Friday, December 4, 2009

A Few Living Room Christmas Decorations and Holiday Appetizers

Happy Friday, my fellow friends!

For many years since Brittney was born, we had Chuck’s side of the family over on Christmas Eve.  And every year, I made the same appetizers.  I usually don’t like to make the same things all of the time. . .I like to change things up a little . . .but everyone loved these and didn’t want me to make anything new.  And even though we don’t get together with his side of the family anymore, these appetizers are still a Christmas Eve tradition.  We now have my sister, Val, and her daughter and son-in-law and their 2 boys over.   A few more of my siblings may be joining us on Christmas Eve this year, as well.  We used to go to my Mom and Dad’s on Christmas day, but as I mentioned in an earlier post, the family is getting larger and have their own family celebrations to try to fit in, so starting this year, my parents are going to start having the family over on the Sunday before Christmas.  And since everyone’s celebration schedules will be rearranged, I’m inviting anyone to my home who would like to spend Christmas Eve with us.

Even though I completely understand the situation my Mom and Dad are in, I feel a little depressed that we are stopping a long time tradition of spending Christmas day together with family.  So, now, like all of the other holidays that we don’t have family to spend with, we’ll try to create some new traditions of our own. 

I hope you enjoy these appetizers as much as we do!!   If you’d like to print these out, just highlight the recipes that you want, and then click “selection” on your printer function.  Only the highlighted sections will print.

Cheese Crescent Rolls

1 pkg. crescent rolls

4 oz. each:  sliced Swiss, muenster, colby & harvarte cheese

1 (8 oz.) pkg. cream cheese, softened

1 egg

Mix cream cheese and egg together.

Form crescents rolls into a square with 1/2 of rolls.  pinch seams together.  Save other 1/2 for top.

On bottom crust, layer sliced cheeses with cream cheese mixture  spread between each layer; ending with cream cheese mixture on top.

Stretch top layer square over cheese mixture.  Fold under bottom crust.

Brush with melted butter and sprinkle with sesame seeds.

Bake 30-40 minutes at 350 degrees until golden brown.  Let sit for 10 minutes before cutting.


Bacon/Sausage Wraps

1/4 c. butter, melted

1 1/2 – 2 c. chicken stuffing mix

      Mix together and set aside.

1 lb. Italian sausage

1 egg

1 lb. bacon

Mix Italian sausage and egg together and add to stuffing mixture.  Salt and pepper to taste.  Refrigerate 1 hour.

Cut bacon strips in half. (I usually cut into thirds and make smaller balls to make more)  Roll sausage into balls and wrap with bacon strip.  Secure with toothpick.

Bake 35-40 minutes at 375 degrees.


Crab Pizza

4 small boboli pizza crusts

1 c. miracle whip

2 tsp. lemon juice

1/2 tsp. salt

1 lb. sea legs

1 c. shredded Swiss cheese

2 T. green onions, chopped

Mix together and spread on top of pizza crusts.

Bake 10-15 minutes at 400 degrees until cheese melts.

Hanky Panky

1 lb. ground beef

1 lb. ground Italian sausage

1 lb. velveeta cheese

1 tsp. Worcestershire sauce

1/2 tsp. garlic powder

1/2 tsp. pepper

2 loaves cocktail pumpernickel bread

Brown beef and sausage together; drain.  Add Worcestershire sauce. garlic powder and pepper.  Chop cheese into cubes and add, stirring until melted.

Spread mixture on cocktail bread, covering well.  Place on cookie sheet and bake at 350 degrees for 10-15 minutes.

Stuffed Mushrooms

1 lb. mushrooms

2 T. butter

1.4 c. Italian seasoned bread crumbs

1 c. shredded cheddar cheese

3-4 T. bacon bits

2 T. minced onion

Remove stems from mushrooms and set caps aside; chop stems.  Cook onions and chopped stems in butter until tender; add bread crumbs.

Remove from heat; stir in bacon bits and cheese.  Mound filling in caps.  Place on cookie sheet and bake at 400 degrees for 15 minutes.


chrbrd

As always, if you’d like to see who else is participating in Colleen’s (And Baby Makes Five) Homemade Holiday Recipe Swap, click here:

homemadeholidays2

chrbrd

The weekend before Thanksgiving, we shampooed our carpets.  And since we had all of the furniture out of the living room, I decided to take advantage of the situation and repainted the walls.  Since my house has kind of an open concept, I painted the dining room walls, too, which also leads into the kitchen, but will get painted later, after we build the new kitchen cupboards.  I also painted the ceiling.  I painted the walls with “Resort Tan” by Sherwin Williams.  Again, the picture isn’t the best due to the lighting.  You can see my cut off point right before heading into the kitchen.  I’m so happy with the way it turned out; all of my decor seems to blend in so much better!

IMG_2025

chrbrd

I’m still plugging along with my Christmas decorations!!  Hopefully, I’ll have them done by this weekend.  I have most of my Living Room done….I’m still trying to figure out my fireplace and I still have the centerpiece of fresh pines to make for my coffee table.  I’m waiting for my local greenhouse to get more variegated orgonia in stock, then I’ll show you how to make a live arrangement.

Here are a few pictures.  It’s been kind of gloomy and rainy for the last couple of days, so the lighting isn’t the best.  It’s suppose to be sunny today, so hopefully, I’ll get some better pictures and share them with you later.

IMG_1961

IMG_1965

IMG_1967

IMG_1970

IMG_1969

IMG_1975

IMG_1981

IMG_1986

IMG_1988

IMG_1989


chrbrd

I’ll be back with more Christmas decor pictures and a tutorial on making live arrangements with fresh greens.

I hope everyone has a wonderful weekend!!  And Thank You so much for taking the time to stop by!!  I love hearing from you, so please leave a comment!

Until Next Time. . . .Kris


Wednesday, December 2, 2009

Heart Ornaments And Outside Xmas Decorations

Wow!!  It seems like forever since my last post!!  I hope everyone had a great Thanksgiving.  Ours was great!  It was very relaxing and we spent a lot of family time together over the long weekend.  During the day we put up our outside decorations and then after dinner, we put up the Christmas tree.  Later in the evening, we went to the movies and saw “Blind Side”.   What a great movie!!   If you haven’t seen it yet, I highly recommend it!  The previews looked pretty good, but I actually wanted to see “The Christmas Carol” instead.   I got outvoted and I’m glad I did!  It was really good! . . . . I still want to see the Christmas Carol!!

I’m slowly getting the inside of my house decorated for Christmas.   I don’t know why it’s taking me so long, maybe I relaxed “too much” over the weekend, but I’m just having a hard time getting things done.  I’m trying to simplify my decor and, so far, I’ve got 2 large rubbermaid tubs filled with things I’m getting rid of.  On the other hand, I’ve also made a few things!  lol

chrbrd    

Here are pictures of our outside decorations:

 IMG_1930

IMG_1933

IMG_1934

IMG_1936

IMG_1938

IMG_1940

IMG_1943

IMG_1944

IMG_1946

chrbrd


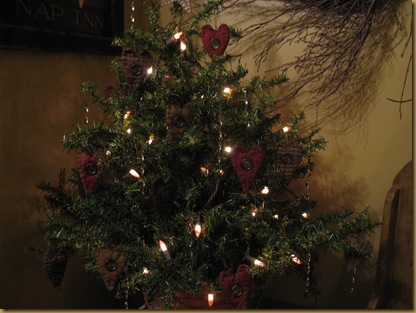
Here’s my new Christmas tree!  I bought this last year from Hobby Lobby after the holidays.  It was originally $400-something but was on clearance for 75% off.  After much searching in the back for one in a box, they finally “found” one.  The box was open and the branches looked like the one I wanted.  I was figuring the cost to be about $75.00, but it rang up for $50-something  and I’m thinking “sweet”..I must have figured wrong!  When we got home, I told my hubby that we ought to take it out and make sure it’s the right one.  Well….it wasn’t!  So we took it right back.  The only one they had like the one I wanted was the one on display, so we took that one.  They just did an even exchange and didn’t charge us the extra cost, so I got an even better deal than the 75% off!

I love this tree!!  The branches are staggered enough so that I can hang ornaments on the inside just like the real Christmas trees we used to get.  We had bought our other tree at Litehouse Pools about 3 years ago and I was never really happy with it because I thought it was too perfectly shaped.  The ornaments seem to lay on the outer edges and after the kids had put on all of their ornaments, there wasn’t much room left for many of mine.  With this tree, I was able to put on all of my ornaments plus need to buy more to fill in some gaps!  

IMG_1951

I made this tree skirt many years ago when “hearts” were in!  lol  I started a new one last year, but I’m still working on quilting it.  Hopefully, I’ll have it done before Christmas!! (probably not!) lol

Do you like my newest tree ornament??!!  I sure can’t wait until he grows out of this stage. . .he LOVES the dangling ornaments! 

 IMG_1926

 chrbrd

IMG_1900

Some of you have asked how I made my heart ornaments, so I’m going to do a tutorial on them.

They’re actually pretty simple.  Draw a heart pattern on a piece of cardstock or cardboard and cut out.  With your fabric right sides together, trace your pattern onto the fabric.  Sew on the marked lines.  Depending on how you want to finish up your heart, either leave an opening for turning right side out or sew the heart completely shut and cut a slash in the back of the heart.

Cut out the heart and clip the curves.  Turn your heart right side out and lightly stuff with polyester fiberfill.   Sew the opening close.  With 3 strands of embroidery floss, do a blanket stitch around the edges. To learn how to do a blanket stitch, click on the link below.

 http://www.futuregirl.com/craft_blog/2007/09/tutorial-hand-sew-felt.aspx

Make a loop with the embroidery floss to hang the ornament.  Tea dye, if you wish, and finish with sewing a button in the center of the heart.

IMG_1956

chrbrd

Thank you so much for taking the time to visit my blog!!  Please stop back here on Friday to see what yummy recipes I’ll have to share for Colleen’s Homemade Holiday Recipe Swap!

PLUS . . . . .I’ll have some pictures of my Christmas decor to share along with pics of my newly painted Living Room and Dining Room walls!!

Until Next Time . . . .Kris

Friday, November 20, 2009

Homespun Holiday Recipes and Snowman Ornament

Happy Friday, my blogging friends!  What a busy week I’ve had and will have an even busier weekend!  Tomorrow Kory has bowling in the morning and after that, I’m meeting two of my sisters and three nieces for a late lunch/early dinner and then we’re all heading to the Christmas Connection at the Cleveland IX Center.  There are suppose to be 100’s of crafters there!  I can’t wait!!

On Sunday, we’re shampooing our carpets so they’re nice and clean for the holidays.  Plus, we’re going to pull out all of the Christmas decorations and go through them to make sure everything’s in working condition (especially the outside decor) and repair anything that needs fixed so it’s all ready to be put out on Thanksgiving day.

I have gone through a few boxes of my inside decorations and decided that I’m going to simplify my decor this year.  I’m going to rid of a lot of my stuff.  At first, I was going to let my sisters and nieces pick what  they wanted, but my daughter said that her friend might be interested in whatever’s left over because she’s newly married and they don’t have many Christmas decorations.  Brittney has been friends with this girl since middle school – they were even roommates all through college and I decided “to heck” with my siblings – they’re older and more established than Rachael – I’ll let Rachael have first dibs.  I kind of chuckled last year when she was telling us how they didn’t have much to decorate their tree with so she was baking gingerbread boys and stringing popcorn and cranberries to hang on the tree along with white lights and tying on some red bows.  I’m thinking, “sounds like the perfect tree to me!!” 

wirebtrswetdiva

There was a radio personality that used to be on a Cleveland radio station that used to talk about wonderful recipes on air and then you could go on the station’s website and print them out.   One day, she was talking about these Oreo Truffles.  She kept talking about how delicious they were, but the best thing about them was that they were so easy to make.  Well, just hearing the word “Oreo” caught my attention!!  I had to try them!  These are VERY easy to make and absolutely delicious!!  I hope you give them a try.

Oreo Truffles

1 (12 oz.) pkg. premium white chocolate chips

1 (1 lb. 2 oz.) pkg. regular Oreo cookies

1 (8 oz.) pkg. cream cheese, cut into chunks

In a double boiler, over hot, not boiling water, melt the white chocolate chips.

Meanwhile, place Oreos and cream cheese in a food processor with a steel blade and process until it’s a thick paste, scraping sides a couple of times.

Roll into 1” balls and dip into melted chocolate.  Let dry on waxed paper-lined cookie sheet and keep refrigerated.  Makes about 50.

**If you want the melted chocolate a little thinner for easier dipping, stir in a little vegetable oil until it’s the right consistency.  Also, for a festive look, sprinkle truffles with colored sugar or other small decorations right after you dip them.  They can also be placed in small foil or paper bon-bon cups.

wirebtrswetdiva

This next recipe comes from Food Network’s Barefoot Contessa.  Once you try these marshmallows, you’ll never want to go back to the store bought ones again!  These are SO good!!  They’re also the perfect treat to top off your hot cocoa with!  The only drawback is…you need a stand mixer.   Also, pure vanilla extract gives it a much better flavor than imitation vanilla flavoring.

Homemade Marshmallows

3 pkgs. unflavored gelatin

1 1/2 c. white sugar

1/2 c. cold water

1 c. light corn syrup

1/4 tsp. salt

1/2 c. water

1 T. pure vanilla extract

confectioner’s sugar, for dusting

Combine the gelatin and 1/2 c. cold water in the bowl of an electric mixer fitted with the whisk attachment and allow to sit while you make the the syrup.

Combine the sugar, corn syrup, salt and 1/2 c. water in a small pan and cook over medium heat until sugar dissolves.

Raise the heat to high and cook until the syrup reaches 240 degrees on a candy thermometer.

Remove from heat.

With the mixer on low speed, slowly pour the sugar syrup into the dissolved gelatin.

Put the mixer on high speed and whip until the mixture is very thick, about 15 minutes.

Add the vanilla and mix thoroughly.

With a sieve, generously dust a 9”x12” non-metal baking dish with confectioner’s sugar.

Pour the marshmallow mix into the pan, smooth the top and dust with more confectioner’s sugar.

Allow to stand uncovered overnight until it dries out.

Turn the marshmallows onto a board and cut them into squares.

Dust the cut sides with confectioner’s sugar.

* These are also delicious dipped in melted chocolate.

** A couple of years ago, I made these for my mom for Christmas.  She loves coconut, so instead of using confectioner’s sugar, I  used toasted coconut to dust the marshmallows with.  They turned out fantastic!!

wirebtrswetdiva

As always, if you’d like to see who else is participating in Colleen’s (And Baby Makes Five) Homemade Holiday recipe Swap click here:

homemadeholidays2

wirebtrswetdiva

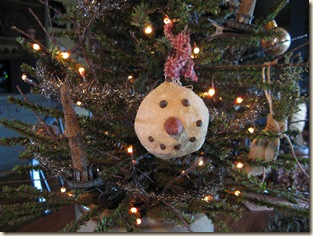
 As promised the other day, here’s a tutorial for making these snowman ornaments.

IMG_1901


Supplies needed:

IMG_1907

Styrofoam balls, whatever size you’d like

Paper Mache – white

Sculpey/Fimo modeling clay – terracotta

paper clips

toothpicks

whole peppercorns or allspice

large ziploc baggy

bowl of water

covered work surface

foil-lined cookie sheet sprayed with Pam

paper towels

First, make the nose by shaping a piece of the molding clay.  Take a butter knife and make marks on the sides to look like a carrot.  Break the toothpick in half and push one half into the nose.  Bake according to the directions on the molding clay’s package.

IMG_1910


To make the hanger, push a paper clip into the styrofoam ball.

 IMG_1909

Put the desired amount of paper mache into a large ziploc baggy.  Following the directions on the packaging, add enough warm water to the mache until it’s the consistency of thick brownie batter.

IMG_1915(I was out of large ziploc baggies, so I used an old tupperware bowl.)

This next step is kind of messy.  Make sure you have paper towels handy and a bowl of water.

Work small amounts of paper mache onto styrofoam ball.  Periodically, dip your fingers into the water to keep the mache from sticking to your hands.  When the ball is completely covered, wet your fingers and smooth out all of the lumps.  Take the nose and push into the ball.  Push whole peppercorns into the mache for the mouth and, depending on the size of the styrofoam ball, use peppercorns or allspice for the eyes.  The finished snowman above has peppercorns for eyes - the one below has allspice (they’re a little larger).

IMG_1913


Place on a foil-lined cookie sheet sprayed with Pam and bake in a 200 degree oven.  For the first couple of hours,  turn the snowman periodically to prevent it from sticking to the foil.  Smooth out any flat ridges. Drying time varies – about 4 - 6 hours.

When snowman is dry, brush him with coffee to stain him.  Place him back in the oven to dry – maybe 15 – 20 minutes.  Repeat process until you reach the desired darkness.

If you want to make a shelf sitter, omit the paperclip and while the paper mache is still wet, push down slightly on the ball to flatten the bottom so he’ll sit flat.  While drying, keep turning but don’t smooth out the ridge on the bottom.

The snowman pictured above on the foil pan is going to be a shelf sitter.  He’s not completely done yet, so I’ll post a picture of him later.

wirebtrswetdiva  I hope everyone has a great weekend!  I have so much more to share with you, but I’ll leave it for other posts!

Until Next Time. . . Kris

Wednesday, November 18, 2009

A Few Homemade Christmas Decorations

I just wanted to share with you a few Christmas decorations that I have been working on.  I haven’t started decorating yet (not until Thanksgiving night), I just threw some lights and garland on a tree so I could take pictures!!

Do you remember these?

IMG_1872

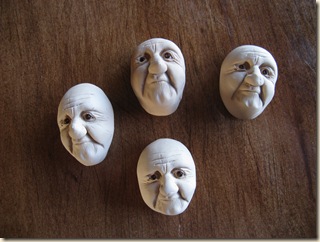
Well, these are what I did with them.  I wanted them to look more like an old St. Nicholas with hoods instead of caps, but I just couldn’t get them to look right.  So these are what I ended up with.  I think they turned out okay.  I have 10 completely done and have 10 more just about done.  Now I just need to figure out where I’m going to put them!  LOL  I think I might tuck them in the garland on my mantel.

IMG_1891

For those of you that thought I sculpted the faces, thank you for your confidence in my crafting abilities, but I used a mold!!  LOL   I’m not sure about other craft stores, but for you fellow Ohioans, Pat Catans carries them in the Sculptey/Fimo clay section.  I inserted small brown glass beads for the eyes and used cotton roving that I bought several years ago  from somewhere I don’t remember for the beard.

I also cross stitched 12 of these little ditty bags.  I loved the ones that Kath (The Olde Weeping Cedar) made and posted on her blog and decided I wanted to make some similar.  I may swap out the sweet annie with some cedar when I buy my fresh greens, but I don’t know.  They look better in person – the sweet annie shows up better than in the picture.

IMG_1905

I made these a couple of years ago.  I just wanted to show them to you now in case anyone liked them, they would have plenty of time to make them.  But looking at them now pictured like that, I may change the buttons to smaller ones.  LOL 

IMG_1900

I also made these a few years ago, too.  They are made out of paper mache with whole pepper corns for the face and fimo clay for the nose.  I’ll post a tutorial on Friday on how to make these.

IMG_1901

IMG_1903


So check back here on Friday to learn how to make these, plus I’ll recipes for Homemade Marshmallows and Oreo Truffles!

Until Next Time. . . .Kris

LinkWithin

Blog Widget by LinkWithin